Navigating The Epson Printer Driver With Photoshop
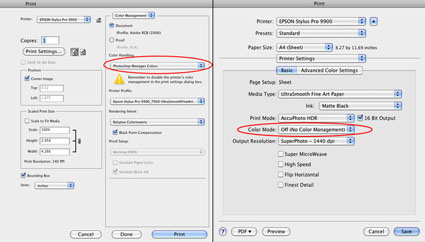
Successfully managing color for digital printing requires that the color in an image file be converted from its device-neutral color space to a device-specific color space. (Typically this occurs by converting from Adobe RGB 1998 or Pro Photo RGB to a device-specific color space defined by an ICC profile characterizing a specific combination of printer, ink, paper, and driver.)
Using Photoshop, you can either convert color in an image before you send it to a printer driver or after you send it to a printer driver.
Choose one method of color management – not two. Easily made, a classic mistake is using both. Double color management typically results in a print that is too light and magenta.
The Epson printer driver provides many ways to manage color conversions and get reasonably good color. Two methods offer the best results; the Photoshop route and the Epson route.
How do you choose either of these methods?
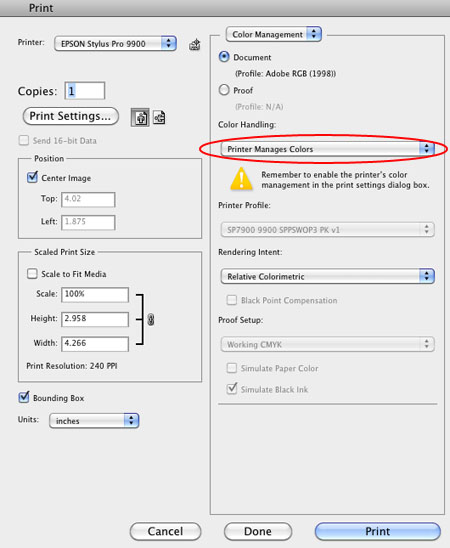
Let Photoshop’s Print window (under Color Handling) guide you – Let Photoshop Determine Colors and Let Printer Determine Colors. (While the principle is the same for most printers, interfaces will vary. Here’s information for the most current Epson interface.)
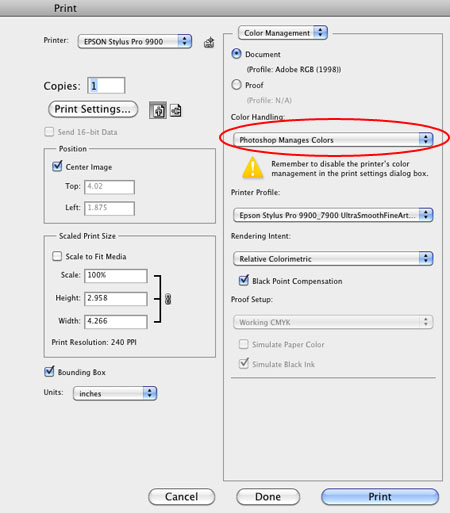
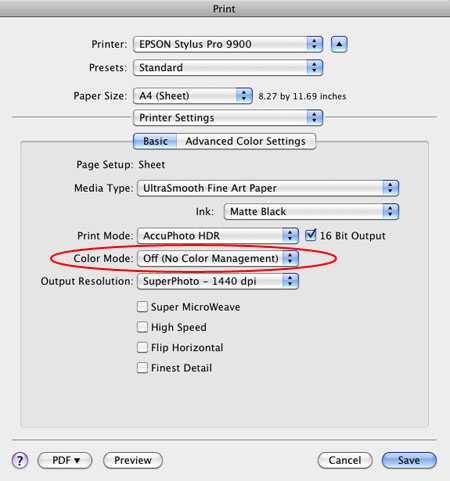
If you choose Let Photoshop Determine Colors under Color Handling, select a profile for Photoshop to make the conversion with (a paper/ink/driver specific profile not the interface default of Working RGB) under Printer Profile, choose a Rendering Intent of either Relative Colorimetric or Perceptual, and then click Print Settings. In the Print window choose the correct Printer and then change Copies and Pages to Print Settings. Select the correct Media Type, uncheck High Speed, and choose the highest printer resolution available. Finally, change Print Settings to Color Management and select Off (No Color Adjustment). The Photoshop route turns Photoshop’s color conversion on and turns the printer’s color conversion off.
The Photoshop route tends to hold slightly more saturation but it’s rendition of neutral colors and gray balance is usually not as good as the Epson route. The Photoshop route is the route to take when you want to use a custom profile. Use it if you are printing with either third-party inks or papers which require the use a custom profile to accurately describe the behavior of the alternate media.
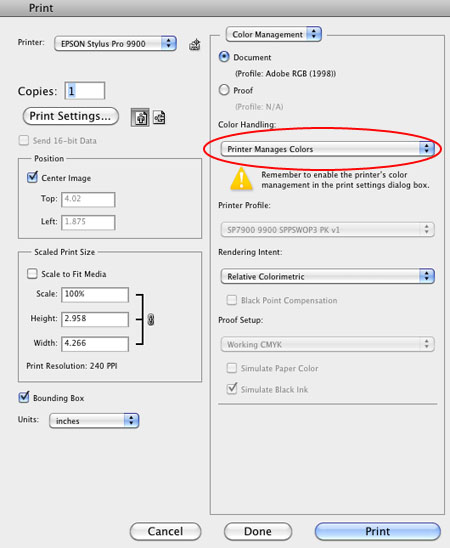
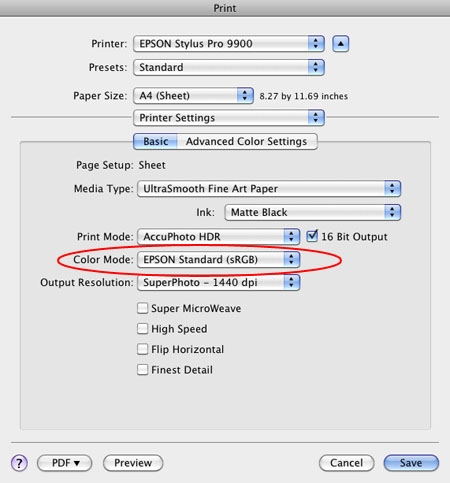
If you choose Let Printer Determine Colors under Color Handling, choose a Rendering Intent of either Relative Colorimetric or Perceptual, and then click Print Settings. In the Print window choose the correct Printer. Change Copies and Pages to Print Settings to select the correct Media Type, uncheck High Speed, and choose the highest printer resolution available. Finally, change Print Settings to Color Management, choose EPSON Standard (sRGB) under Mode, and select Color Controls. The Epson route turns Photoshop’s color conversion off and turns the printer’s color conversion on.
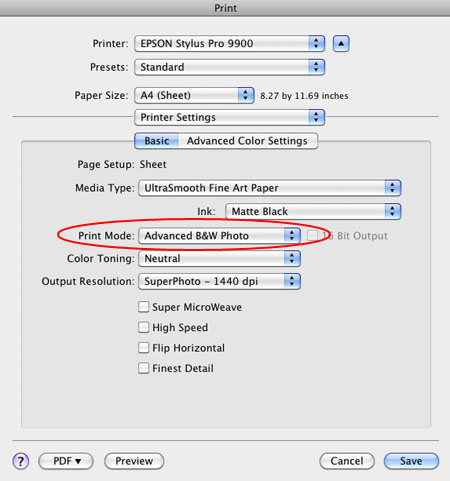
The Epson route tends to deliver a significantly improved rendition of neutral colors and gray balance with slightly less saturation. Try it when printing neutral colors. Use the Epson driver’s Advanced B&W Photo feature for black and white images.
Each route works well. Each route yields slightly different results. Test them to see the differences. (Note that you cannot see the differences between printing routes when softproofing; you have to make physical proofs to see these differences. They can significant.)
The Photoshop Route
1 Choose Print. Select Let Photoshop Determine Colors under Color Handling. Choose the profile you want to print with under Printer Profile. Choose a rendering intent (typically Perceptual or Relative Colorimetric). Check Black Point Compensation Click Print Settings.
2 Under Printer select the printer of your choice.
3 Change Copies & Pages to Print Settings. Select the appropriate or nearest Media Type. Select Color under Color. Check Advanced. Uncheck High Speed. Choose the highest printer resolution available under Print Quality.
4 Change Print Settings to Color Management and check Off (No Color Adjustment).
1 Choose Print. Select Let Printer Determine Colors under Color Handling. Choose a rendering intent (typically Perceptual or Relative Colorimetric). Check Black Point Compensation. Click Print Settings.
2 Under Printer select the printer of your choice.
3 Change Copies & Pages to Print Settings. Select the appropriate or nearest Media Type. Select Color under Color. Check Advanced. Uncheck High Speed. Choose the highest printer resolution available under Print Quality.
4 Change Print Settings to Color Management and check Color Controls.
The Epson Advanced B&W Photo Route
1 Choose Print. Select Let Printer Determine Colors under Color Handling. Choose a rendering intent (typically Perceptual or Relative Colorimetric). Check Black Point Compensation. Click Print Settings.
2 Under Printer select the printer of your choice.
3 Change Copies & Pages to Print Settings. Select the appropriate or nearest Media Type. Select Advanced B&W Photo under Color. Check Advanced. Uncheck High Speed. Choose the highest printer resolution available under Print Quality.
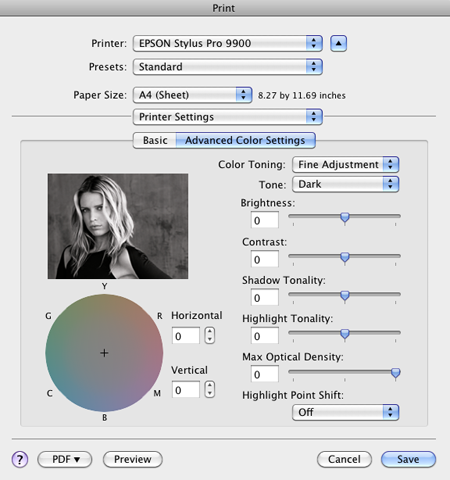
4 Change Print Settings to Color Management and under Tone choose Normal. Optionally, use the color wheel to tint the image.


James Hodges
20.07.2018 at 05:27Really great article. Thanks for taking the time to explain things in such great detail in a way that is easy to understand.
John Paul Caponigro
20.07.2018 at 07:16“Approve”
Arifin Azad
25.03.2019 at 00:43It is good to read your articles very carefully. I do not make it short by praising, such a good post is useful to us, so please post regularly so that many people like me are waiting for a post to post when I post it. Hope you do not hesitate to post this important post for us. You can read the print related article and you can download Adjustment Program in the whole freebies.