Profile Your Printer
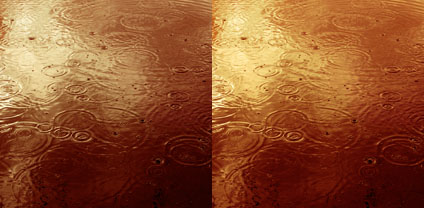
Prints made with default (left) and custom (right) profiles compared.
Good printer profiles help make good prints. Better printer profiles help make better prints. So, logically, you’ll want to use the best printer profiles to help you make the best prints.
How do high-quality printer profiles contribute to print quality? A good printer profile helps render optimum shadow and highlight detail, gradation, neutrality and graybalance, as well as color rendition and saturation. (Remember, printer profiles characterize the combination of a printer’s hardware, ink, media setting, and the substrate you choose. You’ll need different profiles for different substrates on the same printer.)
How can you get good printer profiles? Look to three primary sources. One, use profiles provided by printer manufacturers; they’re free. Two, hire a printer profiling service; profiles cost approximately $100 each. Three, make printer profiles yourself; printer profiling systems run between $400 and $1000. (Profiles supplied by substrate manufacturers are of uneven quality; a few are good, many are bad.)
Which solution is right for you? It depends on both your printing conditions and needs.
If you’re using substrates supported by the manufacturer of your printer, try using the profiles they provide first; they’re often quite good. Years ago, Epson raised the bar on the quality of printer profiles provided by manufacturers. The highly sophisticated routines they use to produce their printer profiles processed by supercomputers are truly state-of-the-art. It’s arguable that you can produce better profiles, even with the most sophisticated profiling solutions available. Their profiling routines factor in subtleties like dot structure or screening frequency. One of the reasons a solution like this works is because the technologies and manufacturing standards they use are so consistent that the unit-to-unit variation between individual printers of the same model is extremely low. (It’s less than a Delta E of 1 or the minimum variation the human eye can detect.) Some, printer manufacturers, like Canon, provide a large number of profiles for substrates made by other companies; their quality is generally quite high with only a few exceptions. Other printer manufacturers, like HP, produce self-profiling printers. They need to be self-profiling, as the state of the printer is constantly changing; when nozzles clog, new nozzles come on line; when ink cartridges are swapped nozzles are replaced. One advantage to a system like this is you can quickly profile a new substrate on a printer with no additional equipment. The quality of the profiles is often good, but there will be times where you’ll want to improve upon it.
No manufacturer provides a comprehensive set of profiles that will cover the entire spectrum of fast-evolving substrate industry. A little experimentation with new media is advised, sometimes a lot. If you experiment with many medias or use more exotic substrates, you’d be well advised to have someone make custom profiles for you or do it yourself.
If you’re using only one or two substrates not supported by the manufacturer of your printer, hire a profiling service to make a printer profile for you. Profiling services are easy to work with. (Try Chromix.com or Digitaldog.net.) You’ll download a profiling target from their website, print it, send the print to them for measurement and profile building, and then they’ll email you the profile. When you do this, make sure you don’t color manage the target file when you open it (Printer targets should be without an ICC profile or “Untagged”; don’t assign one.) or when you print the target. (Don’t use Photoshop CS5 for this, as it’s impossible not to manage the color when printing. Instead, use the free utility Adobe provides on Adobe Labs. Or, use a previous version. Or, use any version of Lightroom.)
IT8 targets are used to measure printer response during profiling.
If you use many third-party and/or exotic substrates and like to experiment with new ones frequently, invest in your own profiling system – a good one. (I use X-Rite’s iOne Photo Pro.) The process of making printer profiles isn’t difficult anymore. Today, you can perform fairly sophisticated tasks quite easily. (See my website for step-by-step text and videos on how to do this.)
Now, there are two other reasons to consider making your own profiles; viewing light-specific profiles and image-specific profiles. Both of these types of profiles have become much easier to make with recent upgrades to X-Rite’s i1 solutions. (I anticipate other manufacturers’ offerings following this trend.)
Light temperature-specific profiles factor in the viewing light prints you make will be viewed in, both the light’s color temperature and spectral distribution. To date, the vast majority of manufacturers provide printer profiles optimized for the 5000K viewing standard only. Real-world viewing conditions are rarely 5000K. They vary, sometimes dramatically. Most galleries and museums use a warmer light temperature, typically some form of halogen lighting, varying in color temperature between 3300K and 3800K, at least they’re usually smooth spectrum light sources. (See my website for more on this.) If you make your prints with 5000K profiles and view them under 5000K light, your prints will appear warmer when they are displayed under warmer light. Optimize your prints for the light they will be finally viewed under. If you don’t know what that viewing condition will be, adopt a real-world standard that will satisfy the largest number of display conditions possible; 3600K is a good average and a light temperature that a majority of people find most pleasing.
Image-specific profiles can be used to more accurately reproduce hard to render colors, such as very dark or very light saturated colors. Printer profiles are built to accurately render the greatest number of colors possible, but some sacrifices are always necessary. No one profile will be able to render the entire spectrum equally accurately. To build image-specific profiles, both the general patches of a standard IT8 target and the specific colors an image contains are measured. (See my website for step-by-step text and videos on how to do this.) In many cases, one image-specific profile can be used to improve printed results for many other images containing similar colors.
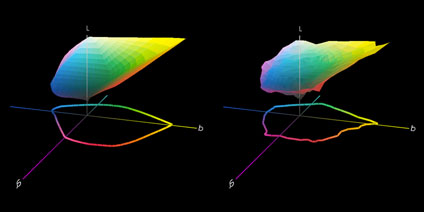
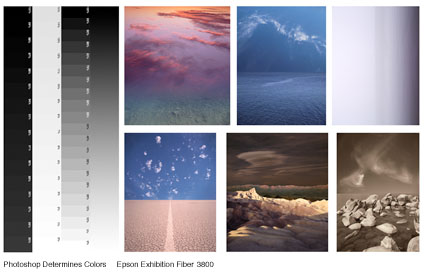
How can you tell if a printer profile is good? Two ways. One, print test charts with both synthetic and real-world information. (Download them from my website.) If your printer renders poor shadow and/or highlight separation, neutrality and/or graybalance, or gradation, use another profile. Two, graph them. (Use Apple’s ColorSync Utility or Chromix’s Color Think software.) If the 3-D volumes they render are highly irregular, truncated, or contain spikes and/or holes in them, use another profile.
Good and bad profiles compared. Irregular shapes, truncations, and holes are signs of bad profiles.
Test prints allow real-world evaluations of results from profiles.
Printer profiles can make or break print quality. With today’s advances in printer profiling technology, they rarely do. But, printer profiles always make both significant and subtle differences in quality that are substantial enough to warrant serious care and consideration. Rely on trusted sources to provide you high-quality printer profiles and/or learn to make them yourself. Then, test the profiles you use to confirm that you’re truly getting the highest quality profiles possible. You need them to make the highest quality prints possible. Both you and your images deserve the best.
Read more on Color Management here.
Read more on digital Printing here.
Learn more in my digital photography and digital printing workshops.


Charles Brackett
22.12.2011 at 07:31JP – I am always wondering how images of printed pictures are captured for a web presentation. Do you print these two photos, then scan them? Do you recapture with a camera? Particularly when making such detailed color comparison as a discussion on profiles requires.
johnpaulcaponigro
22.12.2011 at 10:44Hi Charles! – This is a simulation of the prints made with two different profiles. As such, it’s probably exaggerated 20%, but it proves the point. This image in particular benefitted from a custom profile. That same custom profile rendered neutrals a little too warm, so it was really best for rendering saturated colors. Unfortunately, it’s not a one profile or one color management route fits all world. More recently, people are making image specific profiles, which I would only consider for particularly challenging to print images (all very saturated blues, or all very saturated blacks, perhaps one optimized for flesh tones, etc).
Mike Taylor
27.03.2019 at 18:45https://uploads.disquscdn.com/images/62d4fe8817eae0997555185306a47ee6f969b052fe60731bfaf4e6cb368ddb02.jpg If only every photographer and wannabe photographer knew about calibration and ICC profiles, the resulting prints would be so much more improved.
Brother Printers UK
21.11.2019 at 06:55Thanks for posting article..keep posting always
Hire Us for Brother printer Offline Issue – Router Error Code