The 10 Most Collectible Photography Books

“Collectors are willing to pay steep prices for the world’s finest photography books. Rare editions from the likes of Robert Frank, Hennri Cartier_Beesson, Irving Penn, and Ansel Adams are among the most sought-after of all art books. Sometimes these books have captured an era or a location, sometimes they have helped to coin an artistic trend, sometimes they are simply the finest work of a particular photographer.”
Richard Davies comments on the 10 most collectible photo books and 5 more.
Find my recommended photography books here.
Crop or Retouch ?

As visual communicators, we’re responsible for everything that’s in the frame; we’re also responsible for everything that’s not in the frame. Deciding what’s in the frame and what’s out is a critical decision that can make or break an image. Here are two essential framing strategies.
1.?Use the frame to eliminate distracting information around a subject.
Take extra care with image information that touches the frame, as it will draw extra attention. Do this with significant compositional elements.
2.?Eliminate space around a subject to focus a viewer’s attention.
A lot of space between the subject and the frame can be used to call on psychological associations with space, such as freedom or isolation. Some space between the subject and the frame can give the appearance of the subject resting gracefully within the frame. Touching the subject with the frame strongly focuses the attention of the viewer and may seem claustrophobic. Cropping the subject with the frame can focus the attention of the viewer on specific aspects of the subject and/or give an image a tense quality, evoking evasion and incompleteness—this often seems accidental if less than half the subject is revealed.
There’s more than one way to apply these strategies. While cropping techniques are simple to practice, the reasons for their application and the choices made about how to apply them, as well as the final effects, may be exceptionally complex. You have two choices ..
1. Reposition the frame before exposure.
2. Contract the position of the borders of an image after exposure
If you plan to retouch, you’ll frame and crop differently …
Read more at Digital Photo Pro.
Find more digital photography techniques here.
Learn more in my digital photography worskhops.
The View Project – Joyce Tenneson
Interview – NIK Radio

Recently, I spoke with Scott Sheppard on NIK Radio. Scott wanted to talk about how to avoid “Photographic A.D.D.”. He asked, “So what do you do?” I replied, “You have two choices. You can spray and pray. Or, you can look before you leap.” I elaborate in our wide ranging discussion on how to focus your creative vision.
Listen to our conversation on NIK Radio.
Find more audio inspiration on my website.
Learn more about creativity in my digital photography workshops.
Start a GroupBook project on Blurb
Start a book project with Blurb BookSmart® and invite others to contribute with GroupBook.
Learn more in my online Bookmaking resources.
Learn more in my Professional Portfolio workshop.
How to Get the Best Color with Blurb’s PDF to Book
Manage color with Blurb’s PDF to Book workflow.
Learn more in my online Bookmaking resources.
Learn more in my Professional Portfolio workshop.
Using Adobe® InDesign® to Make a Blurb Book
Use Adobe InDesign® to create compliant PDF files by using the Blurb PDF/X-3 Export Preset and the Blurb Templates.
Learn more in my online Bookmaking resources.
Learn more in my Professional Portfolio workshop.
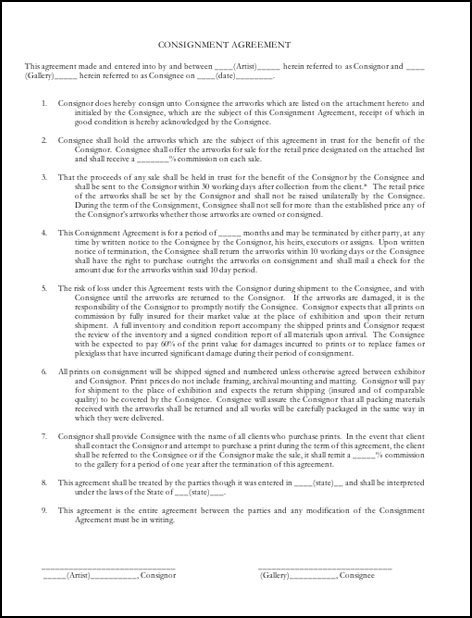
Gallery Contract

Sign a contract with anyone who exhibits your artwork.
Putting verbal agreements in writing produces something tangible that all parties can refer to if memory fails – and it will. You and your representatives need a contract to work professionally together. If someone is unwilling to put something in writing, they’re not likely to honor it. Contracts are not about taking people to court; when they work best they keep you out of court.
Below is the contract my lawyer wrote for me. He’s graciously agreed to let me share it with you.
Change this basic contract to reflect the specific nature of your agreement with the agents or agencies who represent your work.
Don’t change clause 2. This key clause changes the nature of the consignment agreement. If the entity (individual or business) doesn’t reimburse you for sales or return your work you’ll be able to involve local law enforcement agents more easily. I’ve only had to do this once. So far, I’ve always been paid for sales of my work and I’ve always had my artwork returned. Many artist’s can’t say the same.
Do include a termination clause. Contracts should be revisited periodically – I recommend annually – to confirm that the nature of a relationship has remained the same. If it has evolved, change the contract to reflect that evolution.
Find more business resources for artists here.
Read more to see the contract I use … Read More
Ansel Adams iPad App

The world of ebooks is maturing rapidly.
Recently an iPad App entitled Ansel Adams was released. It contains …
– 40 images (which can be viewed either with or without commentary)
– 3 videos (one includes Adams playing piano)
– 1 interview (Playboy magazine)
– letters (with other luminaries like Steiglitz, O’Keefe, Weston, and others)
– postcards (send your own virtual postcard from the app)
– weblinks
– chronology and bibliography.
The content reveals a great deal about the artist’s art and life.
This ebook/app suggests many of the kinds of content and form factors that will inevitably reshape the very nature of the book, when it is delivered electronically.
Find the ebook/app here.
Learn more about Ansel Adams here.
Find 20 quotes by Ansel Adams below … Read More

