Blog - John Paul Caponigro
.

Extending Format – You Can Use It For More Than Panoramas

1_Left

Left

2_Right

Right

11_Antarctica_2009-CIX

Panoramic stitches combine both

Think Outside The Frame

No one needs to learn to “think outside the box” more than photographers. The frame, literally a box, is often our greatest ally. Learning to see photographically is in part learning to see within the limits of this box and use them creatively. But there are times when this limits our vision unnecessarily. Once we’ve learned to see within the box, we then need to learn to also see outside the box – and start extending the frame with multiple exposures to perfect select compositions. Extending format techniques aren’t just for panoramic image formats. They can be used to give you the extra inch that can make all the difference in the world for your compositions.

Hand-held Exposure Techniques

While the best way to make exposures for panoramic merges is to use a dedicated panoramic head on a tripod, this may not be practical – or necessary. (There are three significant benefits to using panoramic tripod heads; one, they keep the camera level and without rotation throughout an exposure sequence, two they calculate the number of and overlap between exposures, and three they pivot the camera around a lens’ nodal point minimizing parallax.) Today’s software packages work miracles making what was once impossible possible. Several practices can help you make better hand-held exposures for panoramic merges.

Keep the horizon level in all the exposures; varying rotation can cause improper alignment and/or excessive cropping and/or retouching.

Shoot a little loose. Perspective correction in these types of photo merges often resulting in irregular borders that beg cropping – or retouching, if this is appropriate. The extra wiggle room you gain from shooting loose will allow you to crop the final results more precisely.

Don’t shoot the separate exposures edge to edge. Instead, overlap your exposures by a third for medium lenses, a half for wide-angle lenses, and two-thirds for fisheye lenses.

Make exposures with the opposite orientation as the final image orientation; if you’re making a horizontal composition shoot with a vertical camera orientation and if you’re making a vertical composition shoot with a horizontal camera orientation. This does two things. One, it increases the number of frames, and thus vanishing points, reducing the tendency for the required perspective correction to produce distortion artifacts. Two, it increases resolution – a tendency that becomes compounded with each added pass in multi-column or multi-row exposure sequences.

Once focus is set, turn off auto-focus during the bracketing sequence. Unwanted shifts in focus may ruin an exposure sequence. For this same reason, consider shooting all exposures in a single sequence at the same aperture setting, as significant variances in depth of field between frames may be challenging to merge convincingly.

Consider using manual exposure. While software can convincingly blend exposures with significantly varying exposures, if brightness across a scene remains fairly constant keeping the same exposure settings between different shots can aid the blending process. (The same is true for white balance, which can be set either during exposure or during Raw processing.) On the other hand, if brightness varies dramatically, bear in mind that simultaneous HDR exposure bracketing is not out of the question; it just increases the number of exposures needed.

LR_Start

Lightroom’s Panorama Merge Preview

LR_AutoCrop

Auto Crop checked

LR_BoundaryWarp

Boundary Warp slid to 100

ACR_Start

Adobe Camera Raw’s Panorama Merge Preview

ACR_AutoCrop

Auto Crop checked

ACR_BoundaryWarp

Boundary Warp slid to 100

Stitching / Merging
Merge to Panorama in Lightroom and Adobe Camera Raw

You can perform panoramic merges in either Adobe Lightroom or Camera Raw. Their interfaces may look different but they’re the same.

There are three advantages to making panoramic merges with these Raw converters. First, it creates a new combined file in DNG format and allows future access to the Raw data in the files. Second, they offer simple but powerful post-merge distortion (Boundary Warp) and Auto Crop options that Photoshop’s Photomerge doesn’t. (This means you’d only choose Photoshop when you wanted to use its additional merge projection options Collage and Reposition.) Third, the DNG file takes up less space than the PSD or TIFF file Photoshop generates.
How do you do this?
Read More

Use Multiple Exposures To Remove Unwanted Objects With Photoshop

20090517_NAMIBIAsossusvlei0111

20090517_NAMIBIAsossusvlei0112

20090517_NAMIBIAsossusvlei0113

Combine 3 or more exposures into 1

MergedOut_Mean

Remove moving objects using Photoshop's Smart Objects

Use the Stack Mode Mean

MergedOut_Minimum

Keep moving objects using Photoshop's Smart Objects

Use the Stack Mode Minimum

It’s a perfect shot! If only those unwanted objects (cars, birds, people, etc) in the scene would disappear. As long as the unwanted elements in your frame move, even just a little, you can make them disappear from your image, by taking two or more shots and using Photoshop’s layering and blending capabilities.

You don’t have to retouch your image. Blending is different than retouching. The unwanted elements aren’t covered over with new information, by hiding them with replacement information similar to the surround, either from the same source or another. With blends, the information behind the moving subject is revealed. How? It’s contained in the other shot(s).
You can even do this with exposures that are made with slightly different angles of rotation or framing, so you can use this technique with handheld exposures, not just those made with a tripod. Camera motion may make manual registration difficult, but Photoshop will automatically align and in some cases distort the separate exposures so that they register precisely. In some of these cases, you may need to crop the final result to restore a rectangular frame.

You can even remove stationary objects with blends – if you move. In situations where there is sufficient parallax between foreground and background elements, by varying your angle of view, you can cause significant shifts in position of foreground elements without causing significant changes in position of background elements. Make multiple exposures from multiple angles of view and you can blend out the elements that appear to move. When using this technique, shoot loose, planning to crop more after the merger.

If you have only two exposures you’ll need to manually mask the top layer. If you have three or more layers Photoshop will automatically blend the layers.

So how do you do this with Photoshop?


Insights Members can login to read the full article.
Email:
or Sign up

Extend Depth of Field With Focus Stacking

2_back2

Foreground in focus

1_front

Background in focus

3_infiniteDOF

Two exposures combined to achieve infinite depth of field

How deep would you like your depth of field to be? The choice is yours. Today, there are virtually no limits. You can extend depth of field beyond the physical limitations of any lens/camera system with multi-shot exposure practices and software – by compositing multiple exposures.

To do this you first need to make a set of focus bracketed exposures, optimizing focus in different image areas. How many exposures you’ll need will depend on how much depth of field a scene contains. At a minimum, make two exposures; one focused on the foreground and another focused on the background. Making three exposures is better; one each for foreground, middle ground and background. When dealing with extreme depth of field, like macro or microphotography, you’ll want to make more exposures, at least three, probably six, possibly more. When in doubt, make more exposures than you think you’ll need; you don’t have to use them all when you stack the separate exposures, but they’ll be there if you need them. Unlike bracketing for HDR, it’s almost impossible to automate these types of bracketing sequences in camera as focus needs to be adjusted for each frame. However, for tethered shooting, you can use software such as Helicon Remote to take control of your camera and automate this process and other bracketed sequences like HDR and time-lapse. Whenever possible use a tripod to make focusing during exposure more precise and registration during post-processing easier. While using a tripod always delivers more reliable results, don’t let this stop you from trying this technique hand-held, especially with simpler sequences, like those used in landscape. You may notice that In cases involving extreme depth of field, you may notice the relative size of objects may change between individual exposures. These effects will be automatically adjusted during the merging process.

Before you combine a set of focus bracketed exposures, make all the Raw conversion adjustments you’d like to make to the final file. It’s quick and easy to process a focus bracketed series of files; process one file in the series ideally and then Sync the other files to it. Once a Raw file is rendered, you can’t re-access the data in it, such as ‘recovering’ highlights or ‘filling’ shadows, without re-rendering it. While, you can adjust lens distortions after stacking with Photoshop’s filter Lens Corrections, it’s much easier, faster and more robust to apply Lens Corrections during raw conversion, before focus stacking 16-bit TIFFs.

Once you have a processed set of focus bracketed exposures you can automate the process of stacking and blending them into a single file in Photoshop. (Unlike HDR and Panorama merges, you can’t make a focus stacked merge in Lightroom – currently.)

6_AutoBlend

Photoshop’s Auto-Blend Layers dialog

7_FocusStackLayers

Photoshop’s auto-masked layer stack

Take these four steps.

1          Using Adobe Bridge highlight all of the files you’d like to combine.
2          Go to Tools > Photoshop > Load Files Into Photoshop Layers
3          In Photoshop’s Layers palette highlight the layers
4          Go To Edit > Auto-Blend Layers, check Stack Images and click OK

You can then further refine these results, including manually adjusting the automated masks or distorting layers, but this is rarely necessary. Photoshop does a fine job for a majority of applications.
.
8_HFmain

Helicon Focus’ main window

9_HFAutoadjustment

Helicon Focus’ Autoadjustment panel

Read More

8 Masters On How To Be An Artist

Rothko_425

You can learn a lot from watching how other artists work, especially if they’re working in another medium. Figuring out how you work in similar ways to produce your own authentic works is an exercise in creativity itself. And creativity is like a muscle, the more you work it the stronger it grows.

You’re sure to be inspired by these 8 masters.

Henri Matisse

Mark Rothko

Francis Bacon

Edvard Munch

Willem de Kooning

Keith Haring

Joan Mitchell

Agnes Martin


Plus enjoy 33 Ways To Be More Creative.

Find more How To Be An Artist posts here.

Find more in my social networks – Facebook and Twitter.
Get more great curated content with my newsletter Insights.

The Art Of Distortion

1a_20111203_ANThalfmoonisland_411-Edit
1b_20111203_ANThalfmoonisland_411-Edit-Edit

1          Correct lens distortion

2a_20100924_AFRNamibiaSossusvleiAerials_0264

2b_20100924_AFRNamibiaSossusvleiAerials_0024

2          Remove or reduce panoramic stitch distortions

3a_Reflection_XXV_5

3b_Reflection_XXV_5 copy

3          Modify proportion globally including the aspect ratio of the frame

4_Correspondence_SonatainBlueV_2001_5

4b_Correspondence_SonatainBlueV_2001_5

4          Modify proportion locally within the frame

5a_Antarctica_2009-CII copy

5b_Antarctica_2009_CII

5          Change proximity

6a_14_Skogafoss

6b_14_Skogafossb

6          Enhance gesture


We accept the distortions angle of view and lens choice create without a second thought, yet rarely do we give a second thought to the possibilities of expressively distorting our photographs during post-processing. The dazzling array of new tools at our disposal begs us to reconsider this. You need to know what’s possible, whether your goal is to correct the distortions introduced by the tools you use or to aesthetically refine or expressively enhance your images, a little or a lot, or to simply know what other photographers have done so that you can understand their creations better. Learn to see with new eyes, and a vast new horizon of possibilities will reveal itself to you.

Awareness of the distortions produced by an angle of view and lens choice is the beginning of using them creatively. Curiously, permission is the beginning of using distortion in post-processing creatively. Many people have been told that it’s inappropriate to do so. Why? Why accept an unintended mechanical bi-product but not a consciously intended effect? Why take such a powerful tool for expression off the table? While you can, you don’t have to distort your images to the point that they look like they’re being seen in a funhouse hall of mirrors. Even the subtlest applications of distortion can produce powerful results. Once you understand what kinds of distortions are possible in post-processing, you’ll frequently find yourself changing your angle of view or repositioning yourself during exposure.

6 Strategies For Using Distortion In Images

Here’s a short list of six strategies you can use when considering distorting your images creatively.

1          Correct lens distortion; straighten a horizontal or vertical while correcting barrel or pin cushion distortion.
2          Remove or reduce panoramic stitch distortions; undistort edges or smooth out uneven horizontals or verticals.
3          Modify proportion globally, including the frame; make images more or less horizontal or vertical or even turn one into another.
4          Modify proportion locally within the frame; adjust the height and width of both objects and areas.
5          Change proximity; push together or pull apart items.
6          Enhance or change gesture; make a leaning object more tilted or straighten it out.

Photoshop's 11 Weapons Of Mass Distortion


Insights Members can login to read the full article.
Email:
or Sign up

The Best Of The Best Photographs Of 2018 Collected

Best Of Best Photographs 2018

The new year is a wonderful time to look at great photographs!

Dozens of media outlets collect their best of the best.

You’ll find links to the best of the best below.

Enjoy!

Pulitzer Prize Winners In Photography 2018

Time Top 100 Photos Of 2018

NY Times The Year In Pictures 2018

Magnum Pictures of the Year 2018

International Photography Awards 2018

World Press Photo 2018

The Guardian Best Photographs 2018

The Atlantic Top New Photos Of 2018

Reuters Pictures Of The Year 2018

The Atlantic Top 25 News Photos Of 2018

Bloomberg The Year In Pictures 2018

NY Times Best Travel Photographs 2018

CNN Best Travel Photos 2018

National Geographic Best Photos Of 2018

Sony World Photography Awards 2018

Lens Culture’s Favorite Photographs Of 2018

My Modern Met Top Photographs From Around The World 2018

Huff Po iPhone Photography Awards 2018

Drone Awards 2018

Audubon Photography Awards 2018

Nikon Small World Photography Winners 2018

The Guardian’s Astronomy Photographer Of The Year Shortlist 2018

Sports Illustrated’s Best Photos of 2018

Car and Driver’s Hottest Car Photos of 2018

Berify’s 11 Famous Portrait Photographers Of 2018

My Modern MET 20 Best Architecture Photos 2018

Best Photography Books Of 2018 – Part 1

Best Photography Books Of 2018 – Part 2

Sign up for my newsletter Insights for more great content.

My Top 12 Photographs Of 2018

01

Constellation

02

Constellation

03

Constellation

04

Constellation

05

Constellation

06

Constellation

07 (1)

Antarctica

10

Land In Land LXXIX

09

Land In Land LXXXIX

08

Land In Land LXXVI

11

Land In Land LIII

12

Land In Land LXXVI

This is a selection of my top 12 images of 2018. This selection doesn’t reflect sales, publication, or activities on the web. It simply reflects my opinion. Click on the titles to find out more about each image.

Geography

The locations include Antarctica, Spain, Arches National Park, Scoresbysund Greenland, and Maine.

Process

Continuing the momentum from the previous year I completed my first seriesof finished works with my iPhone – Land In Land. Processing images on location, sometimes seconds after making exposures, is a gamechanger. Even more interesting is the sense of seeing the image better at arm’s length, allowing me to see the composition and the subject simultaneously.

I was pleasantly surprised when another experiment worked as I combined images in the public domain from the Hubble telescope with my own exposures, expanding the images in my series Constellation to add images of deep space to those of stars observed with the naked eye.

Concepts

I continue to explore presenting many moments in time simultaneously to see one aspect of land through another. In more recent work, the detail and the overview are united in a single integrated experience. As ever, what’s behind and beyond shows through.

My use of abstraction has expanded from minimalism to include more complex maximal patterns.

Magic Moment

Perhaps the most sublime moments were found in Greenland’s, Scoresbysund, as the weather shifted to winter conditions creating dramatic katabatic winds and unusual ice conditions found only at the beginning of the season. Being on the only boat (a three-masted schooner built in the early 1900s) in the fiord system heightened the sense of adventure.

It was a very productive year; more than 75 new works released; more than 150 new studies made.

It’s challenging to choose so few images from so many – but it’s insightful. Try selecting your own top 12 images. Try selecting the top 12 images of your favorite artist(s).

View more of my Annual Top 12 Selections here.
View more images in my ebooks here.
View my full Works here.
View my Series videos here.
View new images in my newsletter Collectors Alert.

Crop, Distort, Or Retouch ?

1_top

Top frame of a panoramic stitch

2_bottom

Bottom frame of a panoramic stitch

3_distortedframe

Panoramic stitch

5_filled

Panoramic stitch distorted

4_cropped

Panoramic stitch cropped

5_filled

Panoramic stitch cropped and retouched

6_filled_large area

Panoramic stitch retouched

The strategies above are not limited to panoramic stitches.

We’re responsible for everything that’s in the frame. We’re also responsible for everything that’s not in the frame. Deciding what’s in the frame and what’s out is a critical decision that can make or break an image.

Here are two essential framing strategies.

One. Use the frame to eliminate distracting information around a subject(s). Take extra care with image information that touches the frame, as it will draw extra attention. Do this with significant compositional elements.

Two. Eliminate excess space around a subject(s) to focus the attention of the viewer. A lot of surround space between the subject and the frame can be used to use to call on psychological associations with space, such as freedom or isolation. Some space between the subject and the frame can give the appearance of the subject resting gracefully within the frame. Touching the subject with the frame strongly focuses the attention of the viewer and may seem claustrophobic. Cropping the subject with the frame can focus the attention of the viewer on specific aspects of the subject and/or give an image a tense quality, evoking evasion and incompleteness – this often seems accidental if less than half the subject is revealed.
Cropping is extremely simple to practice. (While cropping techniques are simple to practice, the reasons for their application and the choices made about how to apply them as well as the final effects may be exceptionally complex.)

Here are two cropping choices.

One. Reposition the frame before exposure.

Two. Contract the position of one or more of the borders of an image after exposure, generally with software.
Because distorting an image during post-processing, by expanding or contracting one or more sides or corners, is a relatively new possibility, most people don’t think of exercising this option. Ironically, anyone who uses lens profiles distorts their images in post-processing to correct lens distortion. Consider this a creative supplement to and extension of that practice. While cropping potentially changes the aspect ratio of an image, distortion does not.

Here are two distortion choices.


One.
 Use Photoshop’s Edit > Transform to distort an image. Push the areas you wish to crop outside the frame. Move one or more sides by pulling the point in the middle.

Two. Use Photoshop’s Edit > Transform to distort an image. Push the areas you wish to crop outside the frame. Move one or more corners by pulling the corner point while holding the Command key.
Retouching used to be complex. Today it can be simple. Never before, has retouching been so easy to do or the results so sophisticated. (To be certain, not all retouching is simple. You can make retouching as simple or as complex as you choose to make it. Retouching is an art that continues to be elevated on a daily basis. But what once required specialized tools and a Herculean effort can now be done with standard software in seconds.)

Here are four retouching choices.

One. There’s cloning. Simply use the Clone Stamp Tool set to Current and Below on a new blank layer. (This will ensure that any retouching can be removed or redone at a later date.) Hold the Option/Alt key and click to sample information to copy, then move the cursor to the area you’d like to copy the information to and click and drag. Repeat until a desired effect is achieved. Typically, donor information is drawn from the same document but you can also clone from one image or file to another.

Two. There’s healing. Use the Healing Brush Tool as you would the Clone Stamp tool. Or, use the Spot Healing Brush, which will automatically select the information sampled for you and can be used within a selection to contain the results. Or, finally the Patch Tool, which will copy information selected with it from or to (depending on whether you check Source or Destination) wherever you drag it to. Healing can’t be done on a transparent layer, so work on a copy of the layer you’d like to retouch. Click on the layer and select Duplicate Layer from the Layer menu or palette. If you need to heal image material contained on multiple layers, create a new composite layer by holding the Option/Alt key select Merge Visible from the Layer palette.

Three. There’s copying and pasting. Just select a region of an image with any selection tool. Copy it. (Edit: Copy) Paste it. (Edit: Paste) Then move the resulting layer into play and mask as needed. (Click the mask icon at the bottom of the layer palette and use a black brush at varying opacities to hide the information.)

Four. There’s filling. Select a region. Fill with Content Aware fill. (Edit: Fill and select Content Aware from the drop down menu in the dialog.) (This feature was introduced with Photoshop CS5.) Photoshop will automatically create an appropriate random texture in the selected area. Like healing, this feature won’t work on transparent layers/areas so, again, use it on a new merged layer.

Software routines such as lens correction and panoramic stitching may distort the frame, subtly but sometimes significantly distorting a composition, and requiring additional measures to restore a rectangular frame. When solving this challenge, you may get better results if you don’t contract the frame as aggressively as you once did and retouch rather than crop to fill in the gap and/or eliminate distracting elements.

Your choice of practices or their application may or may not change the nature of the artifact that you finally create. And, whether the means you choose is appropriate for your objective, the practices you adopt may or may not be accepted by the community of artists you choose to work within – some are more permissive than others. Nevertheless, you should explore your options. You simply won’t know whether it’s for you until you try it for yourself.

Learning to think within the frame is an essential skill for creating strong photographic compositions. But today, learning to think within the frame is only the beginning. You can learn to think outside the frame as well.

It’s a new mindset. Once it becomes second nature, you’ll not only find you have more options for visual problem solving but you’ll also find your visual horizons will have expanded – significantly.

Learn to see in new ways. Combine them with old ways. You’ll find you’ll make images that you once passed by, leaving them unmade or even unnoticed. As a result, you’ll make many more successful images.

Read more in my Exposure lessons.
Learn more in my digital photography and digital printing workshops.
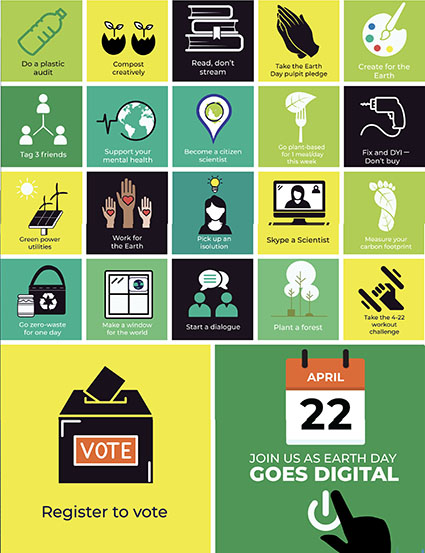
The Famous Philosophical Thought Experiment Mary’s Room


“Imagine a neuroscientist who has only ever seen black and white things, but she is an expert in color vision and knows everything about its physics and biology. If, one day, she sees color, does she learn anything new? Is there anything about perceiving color that wasn’t captured in her knowledge? Eleanor Nelsen explains what this thought experiment can teach us about experience.”
Find more Creativity videos here.
Learn more in my Creativity workshops.