Select And Mask Hue With Photoshop’s Color Range
When you want to make a selection based on hue, start with Photoshop’s Color Range. (It’s located in the Select menu.) It’s an invaluable selection tool that’s easy to master.
The heart of this tool is the default setting for the Select drop-down menu – Sampled Color. Once you learn to use it, you’ll find you’ll use it often. For Sampled Colors, it’s an oversight to activate the slider for Fuzziness (the number of related hues included) and not Range (targeting specific lightnesses). Hope, no request, that Adobe activates both Fuzziness and Range sliders for all drop-down settings. For now, you can overcome this limitation to some extent and customize any range of color with surprising precision by using the icons on the right of the dialog box Eyedropper Tool, Add to Sample, and Subtract from Sample icons as well as the Invert checkbox. It is also the only setting that activates the Localized Color Clusters check box, which essentially adds a radial gradient around the point you sample a color from. You can master this tool in a few minutes.

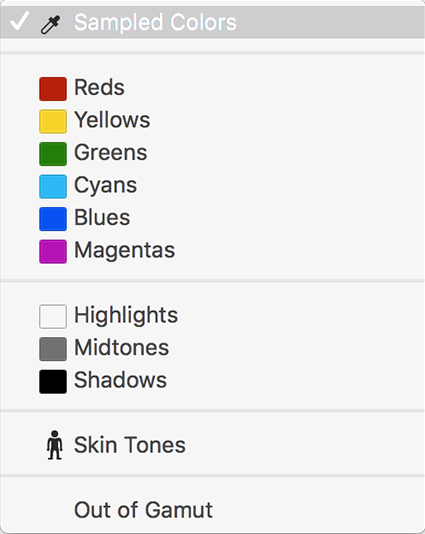
You’ll probably find that you’ll use the other settings in Color Range’s Select drop-down menu sparingly, some not at all.
Skip them. The color choices in the Color Range drop-down menu – Reds, Yellows, Greens, Cyans, Blues, Magentas – are almost useless. They’re not as accurate as you’d like them to be and they don’t offer Fuzziness or Range sliders to control them with. It’s all or nothing, usually nothing.
Use them occasionally. The Highlights, Midtones, and Shadows options have improved by activating both Fuzziness and Range sliders. Curiously, if you Invert the Highlights setting you get a slightly different result than simply choosing Shadows setting and vice versa. But don’t worry, the Fuzziness and Range sliders will give you all the control you need to compensate and much, much more. Color Range’s selections of luminance yield different results than making luminance selections by loading channels as selections (See my article Masking Luminosity.); for better or for worse, they tend to produce fewer gray values and so they yield more generous selections with quicker less smooth transitions into surrounding values, as if you added contrast to a channel selection.
Consider it. While it offers only the control of the Fuzziness slider and not the Range slider but adds a Detect Faces feature, Skin Tones can be quite useful – at times. It is clearly biased towards Caucasian skin tones as it picks up whites before darker browns but it does a good job of avoiding very saturated warm hues. If Skin Tones fails, use the default Sampled Colors instead and choose a custom base color you’d like to start with.
Forget about it. Be careful about the Out Of Gamut feature. It works based on the profile loaded for an output device, usually an offset press. It’s designed to help you prepare files for printing by selecting and subsequently desaturating colors that are too saturated to be printed accurately. Using color management and good output profiles is a better way to control gamut compression.
Finally, if you want a larger preview of the selection/mask being generated, the Selection Preview drop-down menu offers four settings that will change the appearance of the image window Grayscale, Black Matte, White Matte, and Quick Mask. In most cases, the generously sized icon in the Color Range window will be all you need.
Photoshop’s Color Range is an indispensable selection tool that continues to improve. When you want to make a selection based on hue, start here.
Read more about Selections & Masks.
Learn more in my digital photography and digital printing workshops.