 More bits of data make more shades of gray.
What’s the difference between 8-bit and 16 bit? The number of shades of gray. 256 versus 65,536 to be exact. With more shades of gray, gradation becomes smoother.
How do you get at these numbers? Digital files are binary. 2 to the 8th power is 256. 2 to the 16th power is 65,536.
2 1 = 2
2 2 = 4
2 3 = 8
2 4 = 16
2 5 = 32
2 6 = 64
2 7 = 128
2 8 = 256
2 9 = 512
2 10 = 1024
2 11 = 2048
2 12 = 4096
2 13 = 8192
2 14 = 16,384
2 15 = 32,768
2 16 = 65,536
16-bit files take twice as much memory to store all those shades of gray. It’s worth it. For an arithmetic increase in file size you get a logarithmic increase in the number of shades of gray.
256 shades of gray are just enough shades of gray to do reasonably well for most imaging applications. The human eye can see approximately 1,000 shades of gray. With 65,536 shades of gray, 16-bit files contain tens of thousands of shades of gray more than you can see.
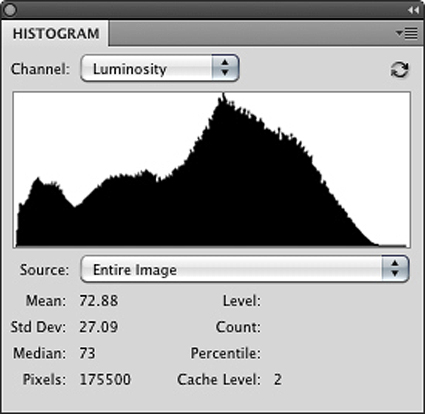
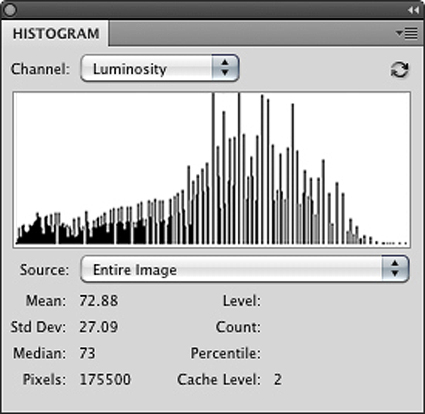
So what are all those extra shades of gray good for? Editing your files to get the best results possible. When a digital file is edited, it loses some shades of gray. If a digital file contains too few shades of gray, it begins to posterize. You may see signs of posterization if an image’s histogram displays combing or gaps and spikes. Before you panic, examine smooth areas of an image to make sure there’s visible posterization. Do this at 100% screen magnification; many times the posterization you see on a monitor is a result of a monitor not being able to display the data as smooth as it is at other screen magnifications. 16-bit files contain so many shades of gray, it’s very difficult for posterization to occur with normal editing – unless you deliberately posterize it with digital filtration.
16-bit doesn’t extend color gamut; 16-bit files can be either small or wide gamut. 16-bit is recommended for files created in wide-gamut color spaces, like Pro Photo RGB, because the steps between tonal values are spread out over a larger distance to achieve greater saturation and so tend to posterize more quickly.
16-bit doesn’t extend dynamic range; it doesn’t generate a blacker black or a whiter white. 16-bit source files are recommended for high dynamic range because HDR images are heavily processed when tone-mapped and would posterize without higher bit depths. In HDR processing, multiple bracketed 16-bit files are combined into a single file with a 32-bit mode used to hold the varied data they contain over a dynamic range that is wider than the device that created them. A 32-bit file is subsequently tone-mapped and rendered down to a 16-bit file with an improved dynamic range.
With the exception of 32-bit files used for HDR tone-mapping, files in Adobe Photoshop can either be either 8-bit or 16-bit.
To get true 16-bit data, you need to generate it when you create a digital file – and preserve it during image editing. JPEG files can’t contain 16-bit data; they’re cooked down to 8-bit. Raw files can. (So can scanned images.)
Not all Raw files contain a true 16-bits of data. While many DSLRs can only generate 10-bits, 12-bits, or 14-bits data, all DSLR Raw files contain more than 8-bits of data, which can only be preserved in Photoshop if edited in 16-bit mode.
You can change a digital file’s mode from 8-bit to 16-bit, but doing this won’t magically add shades of gray to the old 8-bit data; all this does is create the possibility of adding new 16-bit data information on top of the old 8-bit data; and it doubles a file’s size.
Editing files in 16-bit mode limits some of Photoshop’s functionality; many filters don’t work in 16-bit mode.
You can apply a filter to an 8-bit copy of a 16-bit file and drop and drag the filtered file into the original 16-bit file as a layer. Again, the layer won’t have 16-bits of data and may be adversely affected by subsequent edits if they are aggressive. If edited minimally, the results can be quite acceptable.
Editing your images in 16-bit mode is worth the time and effort. You’ll generate fewer imaging artifacts during editing and so create better-finished files.
Right now, creating 16-bit files is largely about generating the best 8-bit data. (Most monitors can only display 8-bits of data. Improved results in print can only be discerned by the very discriminating eye in select files.) In the future, when monitors and printers make better use of more than 8-bit data, you’ll begin to see visible improvements in gradation when your images are viewed in both display and print.
 A smooth histogram.
 A posterized histogram.
Gaps happen when contrast is increased; tones that were close together are spread apart. Spikes happen when contrast is reduced; tones that were close together become the same.
Avoid this by editing in 16-bit.
Read more in my Color Management resources.
Learn more in my digital printing and digital photography workshops.


