How To Avoid 6 Printing Mistakes That’ll Make You Want To Curse

Having taught over a thousand people for thirty years, I’ve seen and done it all. Here are the most common mistakes that people encounter when printing their images that you can avoid by simply looking at your files more closely and handling your paper more carefully.
Files
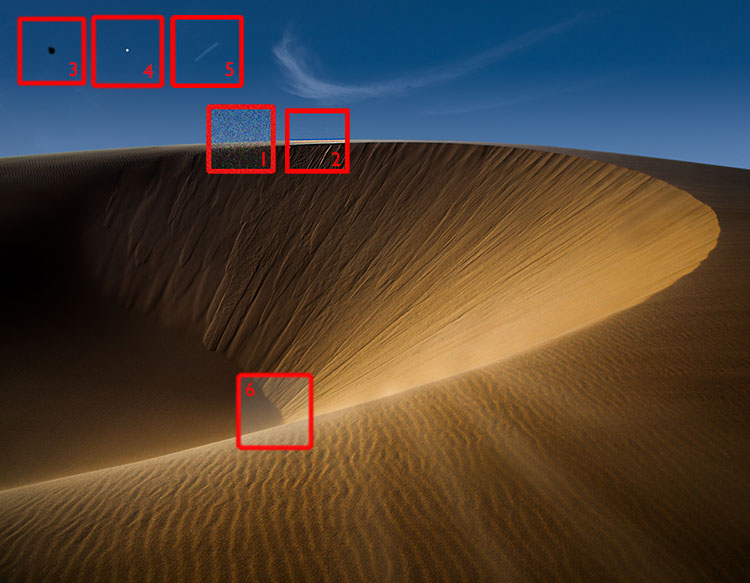
You won’t see this stuff if you’re zoomed out and looking at the whole image. Zoom in to 100% screen magnification. You’ll also miss things if you move around the image erratically. Move through each image one screen at a time and make a systematic quadrant-by-quadrant sweep.
1 – Noise
Too much noise can be distracting, especially color noise, unless you’re an impressionist. A little texture is good and makes images look sharper, so don’t overdo noise reduction, or your subjects will look like they’re made of plastic. Noise is most visible in smooth areas, like skies.
In some cases, you’ll want to reduce noise selectively with layers and masks in Photoshop, for instance, when you want to reduce noise in a sky more aggressively than in a foreground.
2 – Halos
One of the key things you want to watch out for when sharpening is producing halos. Most often seen along high-contrast contours, like horizons, halos are distracting and can make a straight photograph look like a composite. Though it can be done, retouching them is a bitch. So don’t produce them and use lower sharpening settings. If you need more sharpening in areas without contours (and the Texture slider won’t cut it), use layers and masks in Photoshop to sharpen selectively.
3 – Dust In Your File
Those dagnab little dust bunnies. They’re so easy to miss when you’re zoomed out and so easy to see when you’ve made a big print. Even if you keep your camera sensor clean, zoom in and check for them. If you find them, retouch them permanently.
Media
When it comes to media, the mantra is handle with care. This extra consideration will save you time, materials, and money. And it will earn the respect of your viewers. (God forbid that you don’t notice these things until your prints are exhibited.)
4 – Dust On Your Paper
If dust and lint fibers is on your paper while you’re printing, it can act as a resist and later fall off, leaving areas without ink. You can prevent this. First, store your paper in a sealed plastic bag or box. Two, look at your paper in the light and check for dust and lint, and if you see it, blow it off or use a soft brush to wipe it off.
5 – Scuffing
Different than scratching, which gouges the paper surface, scuffing pushes down the fiber of paper and burnishes the particles in the ink, leaving a faint mark that can be seen as a difference in sheen on the surface of the print. Handle your paper carefully at all times, and cover it with a protective sheet when you’re not handling it.
6 – Wrong Side Of The Paper
If you print on the wrong side of the paper, blacks will be weak, colors will fade, and detail will be soft. How do you tell which side is the printable side? One, it’s the side your wet lips will stick to. Two, the printable side will usually feel smoother to the touch. Three, you can feel a slight lip on the edges of the back side where a cutting blade has pushed through the paper.
Pay your files and materials these extra considerations, and you’ll not only make better prints, you’ll also save you time, materials, and money.


